

2026-10-1 price revision: list by brand and annual cost difference
Article content updated: 2026-10-20 | Information checked: 2026-10-20
For those researching malfunctions or cleaning of glo Hilo / HYPER
The device disassembled in this article is the first-generation glo (G001). These photos do not show how to disassemble or clean Hilo or HYPER. For issues with your model, please check the following guides.
Safety Notice (2026-9-23) This article is a past record of disassembling a first-generation glo (G001) in 2017 and is not a repair procedure for current glo products. Do not disassemble or repair heated tobacco devices yourself. The official manufacturer also warns against disassembly or modification; in case of malfunction, please also checkTroubleshooting Guide by Modeland check theofficial glo replacement deskfor assistance. Do not apply the photos or steps in this article to current products.
Glow all 24 types at a glance! From the first generation to the latest and limited models
Good evening, this is Gen-chan, the administrator of MOCROG.
Just one year ago, when Glow was first released, I asked my colleague in Sendai to buy me the first Glow (Model: G001), but for some reason, I had to take it apart.
Neosticks weren't readily available until mid-2017, and since Icos and PlumTecs were the mainstay of my life at the time, I didn't have much of a chance to use them.
It can still be used,There were times when I just couldn't bring myself to take it apart.I did it because of the
I never thought I'd see the time to take apart a glow...
So, this entry is,The contents of the glow will be disclosed!It is not intended to convey any special new knowledge or information.
Please understand that we can only understand "Wow, this is how glow is made.
By the way... I couldn't fix it even though I took it apart.
We hope you understand that disassembly and repair are not the same thing, and we hope you will continue reading.
What made me decide to disassemble glow?
First, why did you decide to disassemble the glow?
This was determined by comments on an article I wrote about how to clean glow.
If you use anhydrous ethanol, it will damage the plastic.
Are smokers the only idiots who can't think that far ahead?
In my cleaning article at the time, I recommended cleaning the interior with anhydrous ethanol and a cotton swab. Because this could not be confirmed as a manufacturer-specified method, I have withdrawn that recommendation. Below is the background of what led to the disassembly back then.
It says "plastic sore."Tobacco components must be heated at a temperature of 200 degrees or higher to vaporize.So I don't think the holes are plastic, as I would expect, but I have never looked inside, so I can't refute that.
Then let's take it apart! This is the kicker.
Archival Photo Record of Disassembling the First-Generation glo (Do Not Reproduce)
That's how I decided to disassemble it, but I can't seem to figure out how to do it....
After searching Google, I found the following article helpful and decided to disassemble it that way.
How to perform glo disassembly and repair / APPLEMAC
Disassembly is from the bottom

The photos below preserve how the author opened the bottom of the first-generation G001 at the time. They do not represent the structure or repair procedures of current models.
The first three items I used were a precision screwdriver (-), a small hammer, and a pair of pliers.
The principle of leverage from the flip side.

This is a photo from back then when I used tools to pry up the bottom plate. Changing where you pry does not make self-disassembly safe; please do not reproduce this.
Because there is a risk of damaging the internal battery, do not insert tools or disassemble the device. These archival photos do not recommend this procedure.
Once the bottom is peeled off, pull it out with pliers.

The bottom is connected to the content part by a nail, but I didn't notice and pulled it out.
At the time, only the bottom came off, and I then used tools to pull out the insides. This is a record of the author's past actions and is not recommended.
Glow side and contents

This photo was taken with the bottom on after all the contents were pulled out.
The glow is made in such a way that the contents are pressed into it.
Glow contents (bottom)

You can clearly see that the contents and the bottom are connected by nails.
Also, the thing that looks like a button battery near the battery is the vibration function part.
Glow contents (surface)

Once the plastic surface is taken off, the base or tube can be removed.
The neostick insertion part that triggered this "disassembly" appears to be metal at a quick glance.
Neostick Insertion Port

If you look closely, you can see something like a brown sheet inside the metal.
I saw a pattern that looked like a circuit, so I think it is probably a flexible substrate (kuru kuru substrate), but I do not know what material it is made of.
I opened the spinning base.

I decided to slowly open the "kuru kuru substrate" that was stored inside the metal cylinder.
Then, more metal tubes came out from inside!
The heating part is still metal!
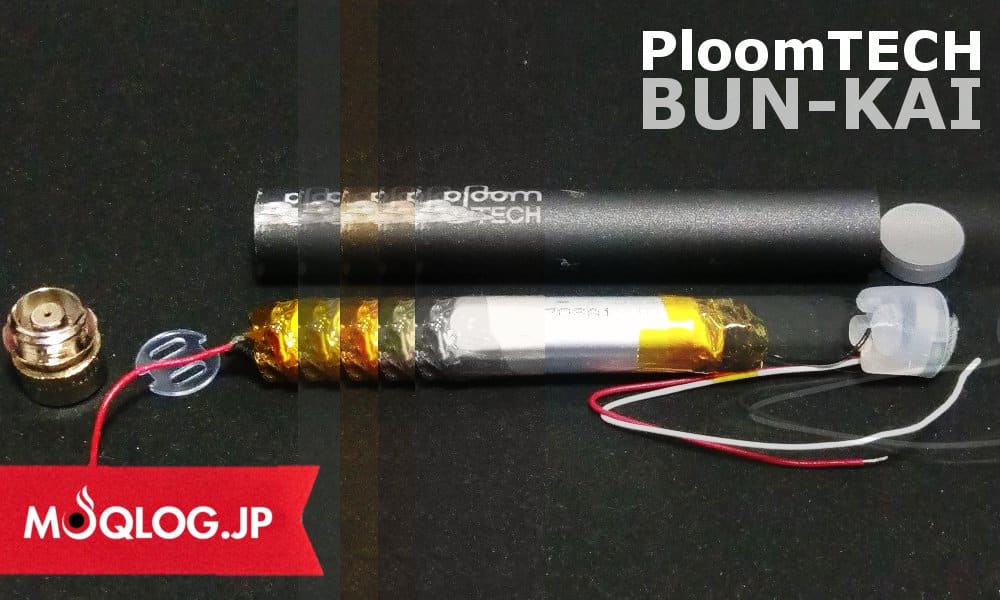
Reference: Disjointed Glow

In case you are wondering, this is the picture of the whole thing taken apart.
The circuit for the power button has been broken when I noticed it, and nothing I can do will fix it now (sweat).
Guess glow heating system
The main source of heat is,The "Kuru Kuru substrate" inside the metal cylinder generates heat, which heats the thin metal cylinder inside the substrate..
The idea is to heat the Neostick with a heated metal part.
However, it is dangerous to have something that emits high temperature near the main board, so I think that the outermost thick metal tube is blocking the temperature....
Not being an expert, I don't know what role anything plays, but I do know that the hole into which the neostick is inserted is ultimately metal.
Must Read] Notes on Disassembly
I write this because it is very important.
1. Do not disassemble or repair the device yourself. The battery model number "18650" mentioned in the old version of this article has been deleted because there was no verifiable basis for it. Do not damage or replace the built-in battery of the product.
2. During the disassembly at the time, there was a moment when the exposed unit heated up for an instant. This is a past record illustrating the danger of self-disassembly. I retract the old instruction to "remove the battery at an early stage" and correct it to advise never removing the battery yourself.
3. If an amateur disassembles it, it cannot be fixed first.
I was hoping to reuse it if possible, but I don't know where to attach the parts that were dislodged when I pulled it out.
I realized once again that amateurs should not do this kind of thing.
I also disassembled the original PlumTec battery, so I will include a link to that article as well.

Supplemental, answer from GLO Customer Center
Just to be sure, I also contacted customer center about how to clean it, but they told me not to put anything other than a brush in the hole (sweat).
I retract the old version's suggestion to "do it at your own discretion since it's unofficial." This page does not recommend cleaning the interior by inserting anhydrous ethanol or cotton swabs. Please check the manufacturer-specified cleaning method for each model.
In addition, regarding your comment, unfortunately, I think it is a pain in the ass....
The main part was metal, but its upper and lower parts were indeed plastic material.
From these disassembly photos alone, it is impossible to confirm the exact properties of the materials or whether chemicals cause damage. The presence of parts that look like metal cannot be used as a basis to judge that cleaning with chemicals is appropriate.
For the article in question, I will include a link to this article and a note in the article's touch section, and I apologize for posting half of the information. m(_ _)m
postscript
This entry would not have been written without that comment, so I'm a little grateful for it.
The!
I think it's because we are in the Internet world that we need to be polite and greet people.
I don't know... I don't think it's right, or I think it's better. or "This is better! I appreciate your comments and take them seriously.
However, comments like this one are frankly no thanks!
Well, I just don't have to approve comments... (sweat) Anyway, that's what I thought.
Safety and Support
Disassembling or attempting internal repairs on a glo device may lead to injury or damage. For symptom troubleshooting and manufacturer support contacts, please select your model name and check.
Correction (2026-10-20): While keeping the account of my experience at the time and the 9 photos, I have retracted expressions that encouraged reproducing self-disassembly, battery removal, or unofficial cleaning. Please check the currentofficial glo supportand the user guide for your specific model.
How Was This Flavor?
Aggregates ratings in 1 click from users aged 20 or older who have actually used the selected brand. By pressing the button, you agree that you are 20 or older and that your response will be used for anonymous aggregation. Response counts are displayed from 5 or more. Options are limited to brands registered in the product master.
1 Did not suit me — 5 Liked it
When you select a brand, the average is displayed if there are 5 or more responses.
🛠 この診断・公式リセット手順で症状は解決しましたか?
手順ごとの解決状況を匿名で集計し、機種別サポートDBの改善に活用しています。改善しない場合は無理な分解や冷却を行わず、各メーカー公式窓口へご相談ください。
 English
 日本語
 简体中文
 繁體中文
 한국어
 Français
 Español
 Deutsch
 Português do Brasil
 Italiano
 Bahasa Indonesia
 ไทย
 Tiếng Việt
 العربية
 हिन्दी
 Русский